
How to – Setup an archive server


How to – Setup an archive server

archive

How to – Setup an archive server

This article is going to go over how to “scratch” install an archive server on CentOS 8, Rocky Linux or Alma Linux. You can pretty much follow it for OpenSuSe as well but there would be some small variations for installing vsftpd.

Step 1 – Install and setup vsftpd

The first thing we have to do is install and properly configure vsftpd.

yum install vsftpd
nano /etc/vsftpd/vsftpd.conf
paste the following at the very bottom:

allow_writeable_chroot=YES
userlist_deny=NO
pasv_min_port=30000
pasv_max_port=31000
userlist_enable=YES
userlist_deny=NO
userlist_file=/etc/vsftpd/user_list
allow_writeable_chroot=YES
vsftpd config
vsftpd.conf config
nano /etc/vsftpd/user_list
(add "cronarchive" to the bottom)

useradd -m -d /home/archive/ cronarchive
passwd cronarchive 
(set the pw u want)

mkdir -p /home/archive
chmod -R 777 /home/archive

Step 2 – Set your archive server in install.pl script

Below is a settings example to put during the install.pl script which can be run by running the following commands. This has to be run on all asterisk servers:

cd /usr/src/astguiclient/trunk/
perl install.pl
archive setup
archive setup during install.pl script

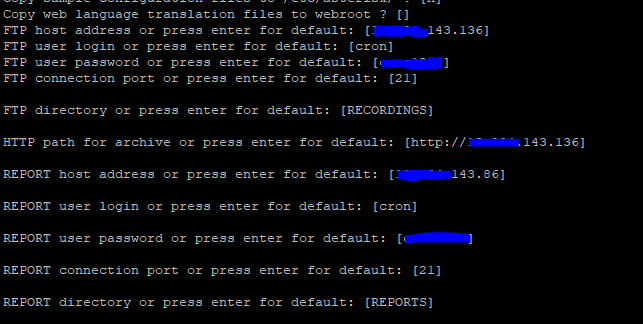
Step 3 – Turning on the cronjob to send the recordings over to the archive server

Changing this cronjob has to be done on all asterisk servers. You have to remove the # in front of this line by typing “crontab -e” and scrolling until you find it:

2,5,8,11,14,17,20,23,26,29,32,35,38,41,44,47,50,53,56,59 * * * * /usr/share/astguiclient/AST_CRON_audio_3_ftp.pl --MP3 --run-check
crontab -e

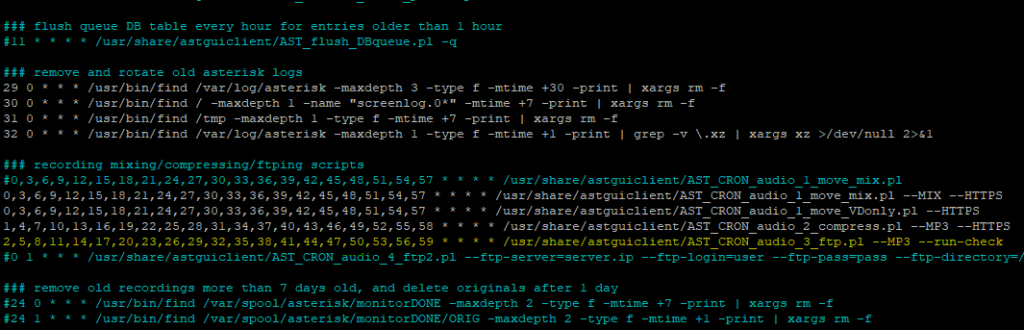
Step 4 – Changing the Apache alias for the recordings

Last thing we need to do is change the alias for the recordings on the archive server as shown below:

nano /etc/httpd/conf.d/record.conf

Alias /RECORDINGS/ "/home/archive/"

<Directory "/home/archive">
    Options Indexes MultiViews
    AllowOverride None
    Order allow,deny
    Allow from all
    Require all granted
        <files *.mp3>
            Forcetype application/forcedownload
        </files>
</Directory>
Apache alias
Apache alias

Well, thats all there is to it, hopefully this will help some of you with improving your cluster setups and properly setting up an archive server.

Comments

Popular posts from this blog

Vicidial Scratch installation Alma -9

Step 1 – Download the dependencies   hostnamectl set-hostname xxxxxx.xxxxx.xxx ### Use YOUR SubDomain vi /etc/hosts ##Change domain name for actual server ip (xxx.xxx.xxx.xxx   complete domain name    subdomain only) timedatectl set-timezone Asia/Kolkata yum check-update yum update -y yum -y install epel-release yum update -y yum install git -y yum install -y kernel* sudo dnf install kernel-devel-$(uname -r) -y #Disable SELINUX sed -i 's/SELINUX=enforcing/SELINUX=disabled/g' /etc/selinux/config     reboot Step 2 – Run the Script cd /usr/src/ git clone https://github.com/manish23k/vicidial-install-scripts cd vicidial-install-scripts chmod +x alma-rocky9-ast16.sh ./alma-rocky9-ast16.sh Or the Asterisk 18 version: chmod +x alma-rocky9-ast18.sh ./alma-rocky9-ast18.sh ####For PHP 8 use this script. chmod +x main-installer-php8.sh ./main-installer-php8.sh

Vicidial Scratch installation Debian 11 with Asterisk 16, WebRTC and Dynamic Portal

  Vicidial Scratch installation Debian 11  Asterisk 16, WebRTC and Dynamic Portal apt update apt upgrade apt-get install git nano wget cd /usr/src/ git clone https://github.com/manish23k/Vici_Install_Scripts_Deb_11.git cd Vici_Install_Scripts_Deb_11/ chmod +x *.sh Run ./vici_install_deb_ast16.sh Install WebRTC ./vicidial-install-webrtc.sh Once Done with Configuration Secure Server with Vici Dynamic Portal Run ./vici_dynportal.sh

How to delete old call logs and other logs in vicidial or goautodial.

Step 1 : SSH to the server using the Putty Step 2:   login to mysql by typing   mysql -p                    (if you dont know password try below command )               mysql -ucron -p1234 Step 3 : select the asterisk database by typing               use asterisk step 4: Run the below command to check total disk occupied by asterisk database                SELECT table_schema AS "asterisk", ROUND(SUM(data_length + index_length) / 1024 / 1024, 2) AS "Size (MB)" FROM information_schema.TABLES GROUP BY table_schema; Step 5 : Run the below command to check disk space consumed by each table in asterisk database SELECT table_name AS "Table", ROUND(((data_length + index_length) / 1024 / 1024), 2) AS "Size (MB)" FROM information_schema.TABLES WHERE table_schema = "asterisk" ORDER BY (data_length + inde...