
How to – Set the time zone for PHP and DB in the reports page for Vicidial


How to – Set the time zone for PHP and DB in the reports page for Vicidial

PHP Time

How to – Set the time zone for PHP and DB in the reports page for Vicidial

Syncing your time zone for ViciDial 

This is a pretty simple process, but if you are unfamiliar with linux, it can be quite overwhelming to figure out how to solve this issue when it relates to vicidial. The steps below will go over how to fix this issue:

ViciDial Cluster
ViciDial Cluster

Login to your server and follow these commands:

  • cd /etc/php7/cli
  • nano php.ini
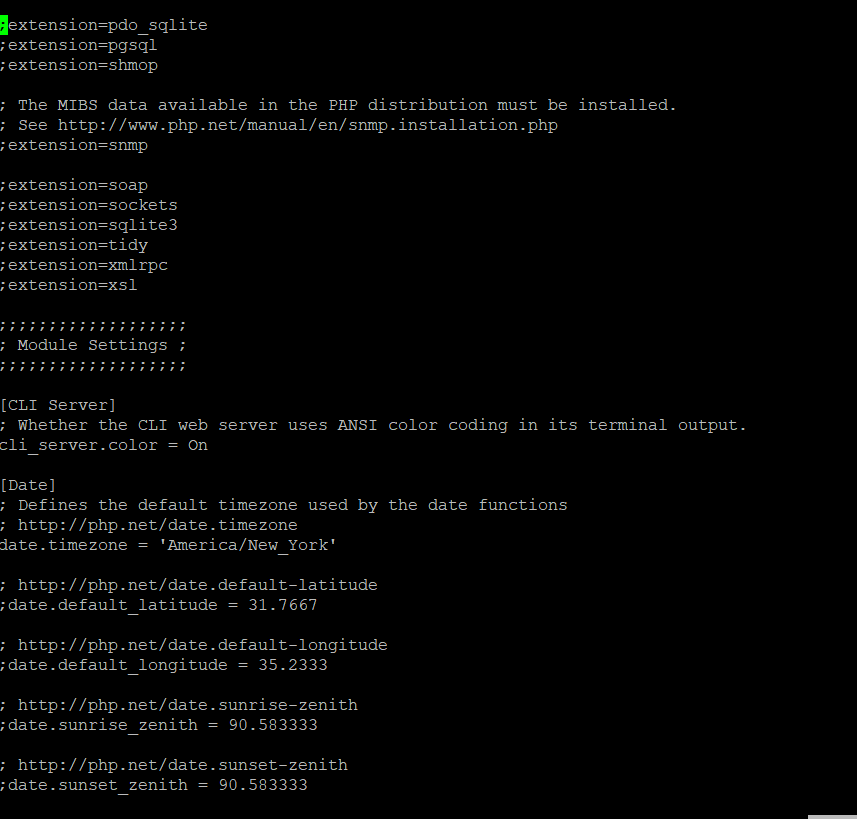
  • pg dn about 24 times until you see the picture below
Vicibox10

Do the same thing for /etc/php7/apache

  • cd /etc/php7/apache
  • nano php.ini
  • pg dn 24 times and change accordingly

That’s all there is to it.

And that’s it, you’re finished

Comments

Popular posts from this blog

Vicidial Scratch installation Alma -9

Step 1 – Download the dependencies   hostnamectl set-hostname xxxxxx.xxxxx.xxx ### Use YOUR SubDomain vi /etc/hosts ##Change domain name for actual server ip (xxx.xxx.xxx.xxx   complete domain name    subdomain only) timedatectl set-timezone Asia/Kolkata yum check-update yum update -y yum -y install epel-release yum update -y yum install git -y yum install -y kernel* sudo dnf install kernel-devel-$(uname -r) -y #Disable SELINUX sed -i 's/SELINUX=enforcing/SELINUX=disabled/g' /etc/selinux/config     reboot Step 2 – Run the Script cd /usr/src/ git clone https://github.com/manish23k/vicidial-install-scripts cd vicidial-install-scripts chmod +x alma-rocky9-ast16.sh ./alma-rocky9-ast16.sh Or the Asterisk 18 version: chmod +x alma-rocky9-ast18.sh ./alma-rocky9-ast18.sh ####For PHP 8 use this script. chmod +x main-installer-php8.sh ./main-installer-php8.sh

How to delete old call logs and other logs in vicidial or goautodial.

Step 1 : SSH to the server using the Putty Step 2:   login to mysql by typing   mysql -p                    (if you dont know password try below command )               mysql -ucron -p1234 Step 3 : select the asterisk database by typing               use asterisk step 4: Run the below command to check total disk occupied by asterisk database                SELECT table_schema AS "asterisk", ROUND(SUM(data_length + index_length) / 1024 / 1024, 2) AS "Size (MB)" FROM information_schema.TABLES GROUP BY table_schema; Step 5 : Run the below command to check disk space consumed by each table in asterisk database SELECT table_name AS "Table", ROUND(((data_length + index_length) / 1024 / 1024), 2) AS "Size (MB)" FROM information_schema.TABLES WHERE table_schema = "asterisk" ORDER BY (data_length + inde...

Install the No-IP client (Dynamic Update Client) on AlmaLinux 9

 Install the No-IP client (Dynamic Update Client) on AlmaLinux 9 1. Install Required Packages First, install the necessary packages to compile the client from source. sudo dnf install gcc make wget tar 2. Download the No-IP DUC (Dynamic Update Client) Download the latest version of the No-IP DUC. cd /opt wget https://www.noip.com/client/linux/noip-duc-linux.tar.gz 3. Extract the Downloaded File Extract the downloaded tarball. tar -zxvf noip-duc-linux.tar.gz cd noip-2.1.9-1/ 4. Compile the Client Run the following commands to compile the client. sudo make install 5. Configure the No-IP Client After installation, you’ll be prompted to enter your No-IP account credentials (email and password) and choose the hostname(s) to update. If not, you can manually run the configuration: sudo /usr/local/bin/noip2 -C 6. Start the No-IP Client To start the client: sudo /usr/local/bin/noip2 7. Verify Installation To confirm that the No-IP DUC is running, use: sudo /usr/local/bin/noip2 -S 8. Set Up...