
How to – Fix the Vicidial error: Code Expects Different Schema


How to – Fix the Vicidial error: Code Expects Different Schema

different schema

How to – Fix the Vicidial error: Code Expects Different Schema

This is a pretty easy fix, “Code Expects Different Schema” occurs when you update your svn version but forget to update the db schema through mysql. The instructions are below.

Vicidial-warning-code-expects-different-schema

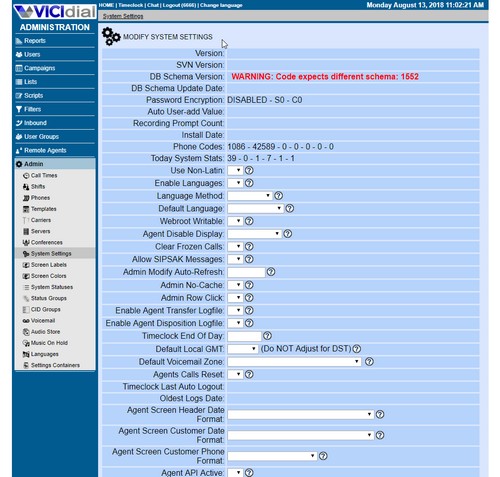
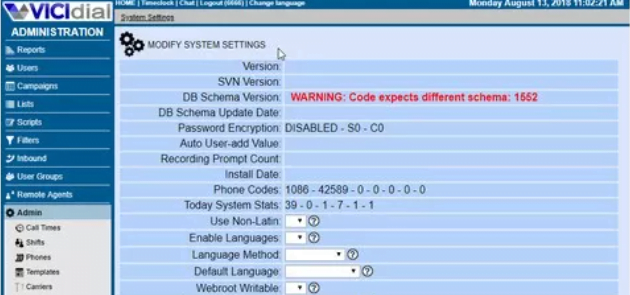
After database dump restoration taken from older Vicibox to the latest Vicibox 9.0.3 I got the following error in Admin -> System Settings section:

WARNING: Code expects different schema: 1585

It’s not possible to change or save any setting. The reason is obvious: Vicibox 9 has new and altered tables and functions so you will have to add them to the restored database before you can use system.

First, confirm your current database schema version. Log in to MariaDB command prompt and perform the following query:

1MariaDB> SELECT db_schema_version FROM system_settings;

Next, navigate to /usr/src/astguiclient/trunk/extras folder and locate upgrade_X.XX.sql files. Open the newest file and if it contains this schema version – this is the one that needs to be executed. In case you found your DB schema version not in the newest .sql , execute it first and then all newer files.

Please make note that some tables and functions may already exist in your database that’s why add -f key to the mysql command:

1# mysql -u root -f asterisk < /usr/src/astguiclient/trunk/extras/upgrade_2.14.sql

Confirm your current database schema version again and make sure it’s been upgraded.

Now you should be able to use the system and change/set settings.

I hope this helps

Comments

Popular posts from this blog

Vicidial Scratch installation Alma -9/10

Step 1 – Download the dependencies   hostnamectl set-hostname xxxxxx.xxxxx.xxx ### Use YOUR SubDomain vi /etc/hosts ##Change domain name for actual server ip (xxx.xxx.xxx.xxx   complete domain name    subdomain only) timedatectl set-timezone Asia/Kolkata yum check-update yum update -y yum -y install epel-release yum update -y yum install git -y yum install -y kernel* sudo dnf install kernel-devel-$(uname -r) -y # Install english language pack dnf install -y glibc-langpack-en # Configure new locale. This basically just edits /etc/locale.conf localectl set-locale en_US.UTF-8 #Disable SELINUX sed -i 's/SELINUX=enforcing/SELINUX=disabled/g' /etc/selinux/config     reboot Step 2 – Run the Script cd /usr/src/ git clone https://github.com/manish23k/vicidial-install-scripts cd vicidial-install-scripts ####For PHP 7.4 use this script. chmod +x alma-rocky9-ast16.sh ./alma-rocky9-ast16.sh Or the Asterisk 18 version: chmod +x alma-rocky9-ast18.sh ./alma-rock...

Install OpenVPN 2.4 and 2.6 on Alma / Rocky Linux

 To install OpenVPN on AlmaLinux 9.5, you can follow these steps: 1. Update the System : Before installing any software, it's a good idea to update your system: sudo dnf update -y 2. Install EPEL Repository : OpenVPN is available in the EPEL (Extra Packages for Enterprise Linux) repository. First, install the EPEL repository: sudo dnf install epel-release -y 3. Install OpenVPN : After enabling the EPEL repository, install OpenVPN: sudo dnf install openvpn -y 4. Install NetworkManager (Optional) : If you are using NetworkManager for managing network connections, you can install the OpenVPN plugin for NetworkManager: sudo dnf install NetworkManager-openvpn -y 5. Configure OpenVPN : Once installed, you need to configure OpenVPN by copying your .ovpn configuration file to the /etc/openvpn/ directory: sudo cp /path/to/your/config.ovpn /etc/openvpn/ 6. Start OpenVPN : You can start OpenVPN by specifying the configuration file directly: sudo openvpn --config /etc...

Alma 9 Vicidial Selfsign Webrtc

I am going to provide step by step guide to integrate, enable and configure the viciphone(a webrtc phone) in vicidial (also applicable to any vicidial based system) using the Self Signed SSL Certificate ,ie without a public-ip and FQDN or accessing the vicidial with internal LAN IP. 1️⃣ Install OpenSSL (if not installed) sudo dnf install -y openssl 2️⃣ Generate a Private Key openssl genpkey -algorithm RSA -out selfsigned.key -pkeyopt rsa_keygen_bits:2048 3️⃣ Create a Certificate Signing Request (CSR) openssl req -new -key selfsigned.key -out selfsigned.csr It will prompt you for details like: Country Name (e.g., IN ) State or Province (e.g., Gujarat ) Locality (City) Organization Name Common Name (Domain, e.g., example.com or your server IP) Email Address You can use localhost or an IP address if needed. 4️⃣ Generate a Self-Signed Certificate openssl x509 -req -days 365 -in selfsigned.csr -signkey selfsigned.key -out selfsigned.crt -days 365 → Valid for 1 year (Adjust as needed) ...